
Advanced Project Structuring — Python — Part I
What you need to know to keep going


Introduction
In our previous article on Structuring your Python projects, we discussed the basic concepts such as modules, scripts, and packages.
Now that we’ve explored the basics of project structuring, let’s dive deeper into the factors that determine the longevity of your Python projects.
Depending on how you create, organize, and document your code, it can have a long life or it can die in no time — we don’t want that.
We want our project to have a long and healthy life, even after we leave a company for instance. It’s our legacy that we are creating. Our memory and our mark.
That’s why I’ve decided to write this article to dive into more advanced topics on how to structure your projects to help you create a long-life project.
In this article, we will delve into advanced topics related to project structuring in Python, building upon the foundational concepts discussed in our previous article.
This is what we are covering in this article:
Python Package Authority A.K.A PyPA
Project Dependency Management
Project Testing using Pytest
Automated Project Documentation
Enough “talking”, let’s jump into what matters.
Python Package Authority A.K.A PyPA
Python is a general-purpose programming language, meaning that it can be used to create various things from web applications, desktop applications, and embedded systems.
PyPA has a vast ecosystem of tools that you’ve probably used or use daily, to name some:
pip — Python package installer. Used to manage packages like installing, removing, updating, and so on. When installing a new package, pip downloads it from the PyPI repository.
virtualenv — A tool used to create an isolated Python environment for each project you work on. If you want to learn more, there is an article on this that I wrote.
twine — This is what we use when uploading our package to PyPI after building it.
PyPA is a community that maintains a core set of software used to build, package, and distribute our Python code to online repositories like PyPI
If you’re not familiar with PyPI, it’s a repository where you can publish your own Python projects and where you can download and install other people's projects.
If you use pip to install packages, you have used PyPI in a certain way. pip is also one of the tools provided by PyPA to manage projects, in this case project dependency which we will go into more detail later.
When it comes to packaging our projects, there are some best practices recommended by PyPA that we can follow to make our lives easier:
Our target users — Who’s going to use our system? Is going to be used internally (in your company), and if so, by another developer or other department?
Where the system is supposed to run — is it a script that runs periodically, is it a desktop application, web application, etc.?
“Is your software installed individually, or in large deployment batches?”
You should define a proper packaging solution that suits your project according to your goal.
For instance, if your project is an API or a web application the approaches would differ from a library or an embedded system.
If your goal is to distribute a library, which can be done by publishing to the PyPI public repository, we have tools like setuptools and wheel — recommended by PyPA.
And that is exactly what we will cover in this section of the article. You must have a solid understanding of basic project structure concepts like modules and packages.
A library can be a single module — a Python file — that you can share to do a specific task or it can be a more complex project containing multiple modules organized by packages — a folder containing modules.
Let’s see how you can set up your project and build it to be ready to publish.
Project set up
One of the many tools provided by PyPA, setuptools, can be used to define your project to facilitate its packaging.
With setuptools you can share your project — “in the form of a library” — that can be installed using pip. The library can be uploaded to the PyPI repository as discussed previously.
To set up your project to be ready to build we need to configure it first. The configurations can be done using pyproject.toml, setup.py, or setup.cfg file.
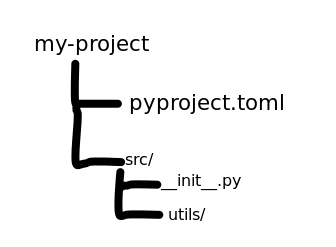
But since the pyproject.toml is the default and the one that setuptools recommends, let’s discuss how you can create one with some basic configurations:
[build-system]
requires = ["setuptools"]
The first thing we need to specify is the build-system table that we are going to use. This was introduced in PEP 518 and it can have multiple keys but the requires key is mandatory.
The requires key receives a list of our project requirements that will be installed using pip in our build environment.
If one doesn’t define the build-system table in pyproject.toml file, the default one will be added when building:
[build-system]
requires = ["setuptools>=40.8.0", "wheel"]
build-backend = "setuptools.build_meta:__legacy__"
After specifying the build-system table, we need to add other tables with the rest of the information needed to package our project:
[project]
name = "your-project-name"
version = "0.0.1"
dependencies = [
    "fastapi",
    'python_version<"3.8"',
]
The project table is where we define our library’s name, version, and dependencies used during development.
If you’re wondering what’s the difference between the requires from the build-system table and dependencies from the project table, the difference is that the requires receive the requirements needed to build the package.
Meanwhile, in dependencies, we put all of the project dependencies that we have in our requirements file or, if we used conda, in our environment.yml file.
In case you have a complex project structure that needs special attention and some files and folders need to be excluded so they won’t be added to the final build project.
The table to specify all this is the tool-setuptools-packages-find, all the keys in the table are optional:
[tool.setuptools.packages.find]
where = ["src"]
include = ["my-project*"]
exclude = ["my-project.tests*"]
More tables and keys for pyproject can be found here.
Perfect! Now that we have defined our configuration and all the dependencies our project needs to run, let's jump into the next step: build our library.
Before you jump into building and uploading your project to the PyPI repository, you should test it locally by building it in your interpreter and mimic working with it as if you have it installed using the pip command.
To do so, you simply run the following command:
pip install --editable . # the dot (.) represents your current project directoryNow that you’re confident and ready to build, you first need to install the build library.
build use the pyproject.toml file you created and based on the information provided, it creates a source distribution (sdist) and wheels (binary distribution).
To install the build library run the following command:
python3 -m pip install buildTo build your library with the sdist and wheels run the following command:
python3 -m build --sdist --wheelNow the last step is to upload or publish your project to PyPI. Luckily this step is very easy and straightforward like the previous ones.
Before pushing to PyPI, make sure you have an account and make sure you have twine installed:
pip install twineTo publish you just run the following command and you will be asked to provide your account credentials:
twine upload dist/*After uploading your project you can find it on PyPI under
https://pypi.org/
project/<my-project>.
Project Dependency Management
Each Python project probably has its own set of requirements that need to be installed to develop it.
These dependencies if not well managed can cause conflict with other projects that live on the same machine. That’s why the first step is to create a virtual environment for your project.
Thanks to PyPA, creating a virtual environment is as easy as running the following commands:
python -m pip install --user virtualenv # install the virtualenv
virtualenv <env_name> # create the virtual environment
More on virtual environments can be found here.
Because your project is portable, and you want to make sure it runs without problem when moving it from your development environment to a testing environment or a production environment, you need to make sure all the dependencies(requirements) are well documented.
There are two ways you can handle the requirements: by adding them to the requirements file each time you install one or by freezing your virtual environment.
The first one is cleaner but you have to remember to add it every time you run the pip install package command.
The second one is easier and in case you forgot to add some dependency to your requirements file you wouldn’t need to worry:
pip freeze > requirements.txt # saves all packages installed in requirements fileBy managing your project dependencies properly you’re making sure that your project has everything it needs to run the same no matter the environment.
So far in this section, we discussed how to manage an environment using virtualenv but it doesn’t mean that it’s the only tool available.
There’s also the conda, a tool provided by Anaconda to manage an environment as well. To create an environment using conda, make sure you have Anaconda installed first, and run the following command:
conda create --name <env_name> # create a new conda environmentIf you wish to create a conda environment with a specific Python version, then the command to create changes a little bit by adding the following parameter:
conda create -n <env_name> python=<version number> # 3.7, 3.8, 3.9, 3.11, 3.11With conda, is also possible to manage dependencies using the requirements file as we did before, and you can still use pip to install packages but it’s recommended to use conda to install packages whenever possible.
To activate the conda environment run the following command:
conda activate <env_name>To freeze dependencies to a file in conda we use the following command:
conda env export > environment.ymlWith conda, we can create an environment from some environment.yml file exported somewhere else:
conda env create -f environment.ymlSo which one should you choose? If you have this question, you probably should stick with virtualenv. It’s easier and widely used.
Anaconda, as you probably know by now is more directed to Data Science.
Project Testing using Pytest
One of the things I neglected the most during my career — testing. To be honest I only started doing it heavily now because, in my current company, we have a requirement to cover 80% of our code base.
It’s a pain to write all these test cases but it’s also very important.
Whether you choose to do a Unit Test, Integration Test, or both, you can use Pytest to create your tests.
We are not discussing tests in full detail here, but just to make sure we are all on the same page let’s see what a Unit Test is and what an Integration Test is.
A Unit Test is the methodology by which we test each piece (unit) of code individually to make sure they work as intended. It’s more guided to test each function/method in your code base.
On the other hand, we have the Integration Test, which is where we test all the units combined to see if the dependencies and the flow work as intended as well.
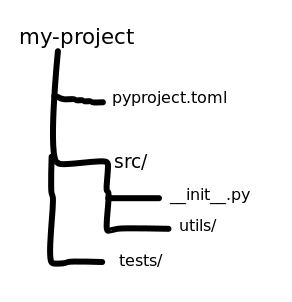
I chose Pytest as my testing framework because it makes it easier to start small and scale as your project grows.
Let’s see some features that make Pytest so great:
Output message: Pytest provides you with detailed messages for your failing tests, which makes it easier to fix your code.
Fixtures: One of the things I heavily use is Pytest’s fixture(we’ll get more into it soon).
Plugins: If you want to test async functions you have a plugin that allows you to. If you need to do mocking tests, you have a plugin. There are over 800 plugins available to use.
Community: An engaging and driven community.
Python unittest support: Pytest supports Python’s built-in unittest library out of the box.
Documentation: Last but not least, awesome documentation to guide you and help you start smoothly.
To start with Pytest, first, make sure you have it installed in your virtualenv:
pip install -U pytestA simple test scenario can be the following:
def print_hello() -> str:
    return "Hello"


def test_print_hello():
   # this will fail
    assert print_hello() == "hello"
To run your tests, you simply execute the following command:
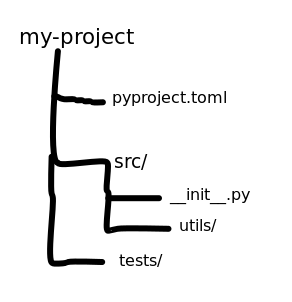
pytestIt will execute all the tests inside your tests folder and subfolders. The convention of naming your test files and test function is — test_<filename> and test_<function_name>.
Sometimes your tests may need parameters to run properly — some dependency. The dependency can be a database connection, network connection, or anything else.
Pytest provides fixtures, which is a way of creating test dependencies that can be easily “injected” on different unit tests.
import pytest

@pytest.fixture
def hello() -> str:
    return "hello"


# hello parameter is the fixture defined
def test_say_hello(hello):
    assert hello == "hello"

def test_say_hello_world(hello):
    assert f"{hello}, world" == "hello, world"
In this scenario, we are using a fixture contained in a single test file. But what if we need the same information — fixture — in different test files?
To create a sharable fixture that can be easily accessed across multiple test files inside your tests folder you need to create a conftest file and add your fixtures:
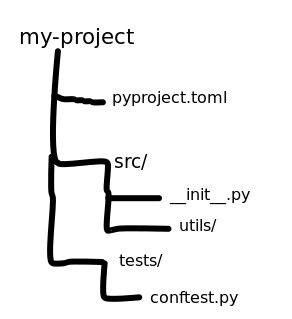
The conftest file would look like this:
from typing import Any
import pytest


@pytest.fixture(scope="session")
def my_global_fixture() -> Any:
    pass
The line that makes it accessible across your test files is this — @pytest.fixture(scope=”session”).
This is good to avoid creating the same fixture repeatedly and will help scale your tests without breaking them.
Introduction
In our previous article on Structuring your Python projects, we discussed the basic concepts such as modules, scripts, and packages.
Now that we’ve explored the basics of project structuring, let’s dive deeper into the factors that determine the longevity of your Python projects.
Structuring Python Project
What you need to know to get started
Depending on how you create, organize, and document your code, it can have a long life or it can die in no time — we don’t want that.
We want our project to have a long and healthy life, even after we leave a company for instance. It’s our legacy that we are creating. Our memory and our mark.
That’s why I’ve decided to write this article to dive into more advanced topics on how to structure your projects to help you create a long-life project.
In this article, we will delve into advanced topics related to project structuring in Python, building upon the foundational concepts discussed in our previous article
This is what we are covering in this article:
Python Package Authority A.K.A PyPA
Project Dependency Management
Project Testing using Pytest
Automated Project Documentation
Enough “talking”, let’s jump into what matters.
Python Package Authority A.K.A PyPA
Python is a general-purpose programming language, meaning that it can be used to create various things from web applications, desktop applications, and embedded systems.
PyPA has a vast ecosystem of tools that you’ve probably used or use daily, to name some:
pip — Python package installer. Used to manage packages like installing, removing, updating, and so on. When installing a new package, pip downloads it from the PyPI repository.
virtualenv — A tool used to create an isolated Python environment for each project you work on. If you want to learn more, there is an article on this that I wrote.
What The Heck Is A Virtual Environment — Python
Understand virtualenv Python and how to create one
twine — This is what we use when uploading our package to PyPI after building it.
PyPA is a community that maintains a core set of software used to build, package, and distribute our Python code to online repositories like PyPI
If you’re not familiar with PyPI, it’s a repository where you can publish your own Python projects and where you can download and install other people's projects.
If you use pip to install packages, you have used PyPI in a certain way. pip is also one of the tools provided by PyPA to manage projects, in this case project dependency which we will go into more detail later.
When it comes to packaging our projects, there are some best practices recommended by PyPA that we can follow to make our lives easier:
Our target users — Who’s going to use our system? Is going to be used internally (in your company), and if so, by another developer or other department?
Where the system is supposed to run — is it a script that runs periodically, is it a desktop application, web application, etc.?
“Is your software installed individually, or in large deployment batches?”
You should define a proper packaging solution that suits your project according to your goal.
For instance, if your project is an API or a web application the approaches would differ from a library or an embedded system.
If your goal is to distribute a library, which can be done by publishing to the PyPI public repository, we have tools like setuptools and wheel — recommended by PyPA.
And that is exactly what we’re going to cover in this section of the article. You must have a solid understanding of basic project structure concepts like modules and packages.
Structuring Python Project
What you need to know to get started
A library can be a single module — a Python file — that you can share to do a specific task or it can be a more complex project containing multiple modules organized by packages — a folder containing modules.
Let’s see how you can set up your project and build it to be ready to publish.
Project set up
One of the many tools provided by PyPA, setuptools, can be used to define your project to facilitate its packaging.
With setuptools you can share your project — “in the form of a library” — that can be installed using pip. The library can be uploaded to the PyPI repository as discussed previously.
To set up your project to be ready to build we need to configure it first. The configurations can be done using pyproject.toml, setup.py, or setup.cfg file.
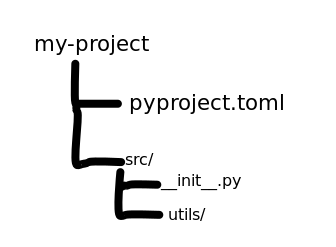
But since the pyproject.toml is the default and the one that setuptools recommends, let’s discuss how you can create one with some basic configurations:
[build-system]
requires = ["setuptools"]
The first thing we need to specify is the build-system table that we are going to use. This was introduced in PEP 518 and it can have multiple keys but the requires key is mandatory.
The requires key receives a list of our project requirements that will be installed using pip in our build environment.
If one doesn’t define the build-system table in pyproject.toml file, the default one will be added when building:
[build-system]
requires = ["setuptools>=40.8.0", "wheel"]
build-backend = "setuptools.build_meta:__legacy__"
After specifying the build-system table, we need to add other tables with the rest of the information needed to package our project:
[project]
name = "your-project-name"
version = "0.0.1"
dependencies = [
    "fastapi",
    'python_version<"3.8"',
]
The project table is where we define our library’s name, version, and dependencies used during development.
If you’re wondering what’s the difference between the requires from the build-system table and dependencies from the project table, the difference is that the requires receive the requirements needed to build the package.
Meanwhile, in dependencies, we put all of the project dependencies that we have in our requirements file or, if we used conda, in our environment.yml file.
In case you have a complex project structure that needs special attention and some files and folders need to be excluded so they won’t be added to the final build project.
The table to specify all this is the tool-setuptools-packages-find, all the keys in the table are optional:
[tool.setuptools.packages.find]
where = ["src"]
include = ["my-project*"]
exclude = ["my-project.tests*"]
More tables and keys for pyproject can be found here:
Configuring setuptools using pyproject.toml files - setuptools 69.0.3.post20231214 documentation
Important If compatibility with legacy builds or versions of tools that don't support certain packaging standards (e.g…
Perfect! Now that we have defined our configuration and all the dependencies our project needs to run, let's jump into the next step: build our library.
Before you jump into building and uploading your project to the PyPI repository, you should first test it locally by building it in your interpreter and mimic working with it as if you have it installed using the pip command.
To do so, you simply run the following command:
pip install --editable . # the dot (.) represents your current project directoryNow that you’re confident and ready to build, you first need to install the build library.
build use the pyproject.toml file you created and based on the information provided, it creates a source distribution (sdist) and wheels (binary distribution).
To install the build library run the following command:
python3 -m pip install buildTo build your library with the sdist and wheels run the following command:
python3 -m build --sdist --wheelNow the last step is to upload or publish your project to PyPI. Luckily this step is very easy and straightforward like the previous ones.
Before pushing to PyPI, make sure you have an account and make sure you have twine installed:
pip install twineTo publish you just run the following command and you will be asked to provide your account credentials:
twine upload dist/*After uploading your project you can find it on PyPI under
https://pypi.org/
project/<my-project>.
Project Dependency Management
Each Python project probably has its own set of requirements that need to be installed to develop it.
These dependencies if not well managed can cause conflict with other projects that live on the same machine. That’s why the first step is to create a virtual environment for your project.
Thanks to PyPA, creating a virtual environment is as easy as running the following commands:
python -m pip install --user virtualenv # install the virtualenv
virtualenv <env_name> # create the virtual environment
More on virtual environment can be found here:
What The Heck Is A Virtual Environment — Python
Understand virtualenv Python and how to create one
Because your project is portable, and you want to make sure it runs without problem when moving it from your development environment to a testing environment or a production environment, you need to make sure all the dependencies(requirements) are well documented.
There are two ways you can handle the requirements: by adding them to the requirements file each time you install one or by freezing your virtual environment.
The first one is cleaner but you have to remember to add it every time you run the pip install package command.
The second one is easier and in case you forgot to add some dependency to your requirements file you wouldn’t need to worry:
pip freeze > requirements.txt # saves all packages installed in requirements fileBy managing your project dependencies properly you’re making sure that your project has everything it needs to run the same no matter the environment.
So far in this section, we discussed how to manage an environment using virtualenv but it doesn’t mean that it’s the only tool available.
There’s also the conda, a tool provided by Anaconda to manage an environment as well. To create an environment using conda, make sure you have Anaconda installed first, and run the following command:
conda create --name <env_name> # create a new conda environmentIf you wish to create a conda environment with a specific Python version, then the command to create changes a little bit by adding the following parameter:
conda create -n <env_name> python=<version number> # 3.7, 3.8, 3.9, 3.11, 3.11With conda is also possible to manage dependencies using the requirements file like we did before, and you can still use pip to install packages but it’s recommended to use conda to install packages whenever possible.
To activate the conda environment run the following command:
conda activate <env_name>To freeze dependencies to a file in conda we use the following command:
conda env export > environment.ymlWith conda, we can create an environment from some environment.yml file exported somewhere else:
conda env create -f environment.ymlSo which one should you choose? If you have this question, you probably should stick with virtualenv. It’s easier and widely used.
Anaconda, as you probably know by now is more directed to Data Science.
Project Testing using Pytest
One of the things I neglected the most during my career — testing. To be honest I only started doing it heavily now because, in my current company, we have a requirement to cover 80% of our code base.
It’s a pain to write all these test cases but it’s also very important.
Whether you choose to do a Unit Test, Integration Test, or both, you can use Pytest to create your tests.
We are not discussing tests in full detail here, but just to make sure we are all on the same page let’s see what a Unit Test is and what an Integration Test is.
A Unit Test is the methodology by which we test each piece (unit) of code individually to make sure they work as intended. It’s more guided to test each function/method in your code base.
On the other hand, we have the Integration Test, which is where we test all the units combined to see if the dependencies and the flow work as intended as well.
I chose Pytest as my testing framework because it makes it easier to start small and scale as your project grows.
Let’s see some features that make Pytest so great:
Output message: Pytest provides you with detailed messages for your failing tests, which makes it easier to fix your code.
Fixtures: One of the things I heavily use is Pytest’s fixture(we’ll get more into it soon).
Plugins: If you want to test async functions you have a plugin that allows you to. If you need to do mocking tests, you have a plugin. There are over 800 plugins available to use.
Community: An engaging and driven community.
Python unittest support: Pytest supports Python’s built-in unittest library out of the box.
Documentation: Last but not least, awesome documentation to guide you and help you start smoothly.
To start with Pytest, first, make sure you have it installed in your virtualenv:
pip install -U pytestA simple test scenario can be the following:
def print_hello() -> str:
    return "Hello"


def test_print_hello():
   # this will fail
    assert print_hello() == "hello"
To run your tests, you simply execute the following command:
pytestIt will execute all the tests inside your tests folder and subfolders. The convention of naming your test files and test function is — test_<filename> and test_<function_name>.
Sometimes your tests may need parameters to run properly — some dependency. The dependency can be a database connection, network connection, or anything else.
Pytest provides fixtures, which is a way of creating test dependencies that can be easily “injected” on different unit tests.
import pytest

@pytest.fixture
def hello() -> str:
    return "hello"


# hello parameter is the fixture defined
def test_say_hello(hello):
    assert hello == "hello"

def test_say_hello_world(hello):
    assert f"{hello}, world" == "hello, world"
In this scenario, we are using a fixture contained in a single test file. But what if we need the same information — fixture — in different test files?
To create a sharable fixture that can be easily accessed across multiple test files inside your tests folder you need to create a conftest file and add your fixtures:
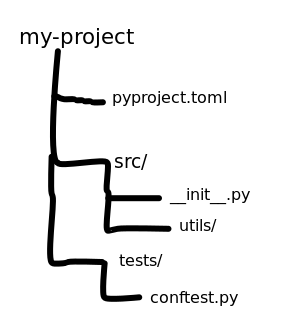
The conftest file would look like this:
from typing import Any
import pytest


@pytest.fixture(scope="session")
def my_global_fixture() -> Any:
    pass
The line that makes it accessible across your test files is this — @pytest.fixture(scope=”session”).
This is good to avoid creating the same fixture repeatedly and will help scale your tests without breaking them.
Automated Project Documentation
I’m not gonna pretend that I write documentation for all of my projects because I don’t. Sadly.
But I did write for some in my current company and my previous one. I wrote them because I knew that in a couple of months, after starting a new project, I would probably forget most of the things I did.
There are a lot of ways through which you can document your project, either by creating a Word document, writing on Google Docs, or using an automated tool like Sphinx.
Sphinx is a powerful tool widely used in the Python ecosystem for generating documentation that can be exported to PDF or generate HTML pages to create online documentation.
A lot of the libraries’ documentation that you see is created using Sphinx, which makes it easier to write beautiful online documentation with a lot of features.
Let’s create a simple documentation for this class:
from typing import Any


class Car:
    """
    A simple class that represents a car in our system.
    """

    def __init__(self, brand: str, engine: str, year: int) -> None:
        """ Initialize the car class with the received arguments

        :param brand (str): the car's brand (i.e. BWM, Kia etc.)
        :param engine (str): it can be dieser or something else
        :param year (int): the manufacture year of the car
        """
        self.brand = brand
        self.engine = engine
        self.year = year


    def create(self, db) -> "Car":
        """Receives a DB session and a car object and save it in our database

        :param db: session connected to some database
        :return: Any
        """
        pass

    def update(self, car: "Car", db) -> Any:
        """Receives a DB session and update the car in our database

        :param car: car object
        :param db: session connected to some database
        :return: Any
        """
        pass
First, make sure you have Sphinx installed by following the instructions here according to your Operating System or simply run the following command in your virtualenv:
pip install -U sphinxAfter installing go to your project directory in your terminal and run the following command:
mkdir docs && cd docs && sphinx-quickstartWhat we did was create a new folder — docs/ — where our documentation will be placed using the mkdir command. Then we make sure we are inside our docs folder running the command cd docs before initializing the sphinx in our project with — sphinx-quickstart.
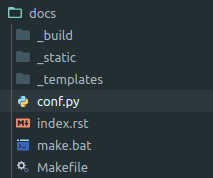
conf.py — This is where the configuration for Sphnix is placed, like project configuration and so on.
index.rst — This file is the main documentation file, where you provide the structure of your documentation such as including modules.
To create the documentation for our project first, we need to make a couple of changes in our conf.py inside the docs folder, so make sure it looks like this:
# Configuration file for the Sphinx documentation builder.
#
# For the full list of built-in configuration values, see the documentation:
# https://www.sphinx-doc.org/en/master/usage/configuration.html

import sys, os

sys.path.append(os.path.abspath('..'))

# -- Project information -----------------------------------------------------
# https://www.sphinx-doc.org/en/master/usage/configuration.html#project-information


project = 'Advanced Project Structuring'
copyright = '2023, Your Name'
author = 'Your Name'

# -- General configuration ---------------------------------------------------
# https://www.sphinx-doc.org/en/master/usage/configuration.html#general-configuration

extensions = ['sphinx.ext.autodoc']

templates_path = ['_templates']
exclude_patterns = ['_build', 'Thumbs.db', '.DS_Store']


# -- Options for HTML output -------------------------------------------------
# https://www.sphinx-doc.org/en/master/usage/configuration.html#options-for-html-output

html_theme = 'alabaster'
html_static_path = ['_static']
Also, make sure the index.rst file looks like this, if we want to create documentation for multiple modules in our project:
.. Advanced Project Structuring documentation master file, created by
   sphinx-quickstart on Fri Dec 15 12:28:03 2023.
   You can adapt this file completely to your liking, but it should at least
   contain the root `toctree` directive.

Welcome to Advanced Project Structuring's documentation!
========================================================

.. toctree::
   :maxdepth: 2
   :caption: Contents:

   modules # this is in case we have multiple modules in our code

Indices and tables
==================

* :ref:`genindex`
* :ref:`modindex`
* :ref:`search`
Having done this, now we can create the documentation by running the following command:
sphinx-apidoc -o docsAll generated files will be placed inside our docs folder. To visualize our documentation in a browser we need to create the HTML file first:
cd docs && make html # make sure you are inside docs folder firstAn index.html file will be created inside _build/html, and you can open it in your favorite browser, and the result should be something like this:
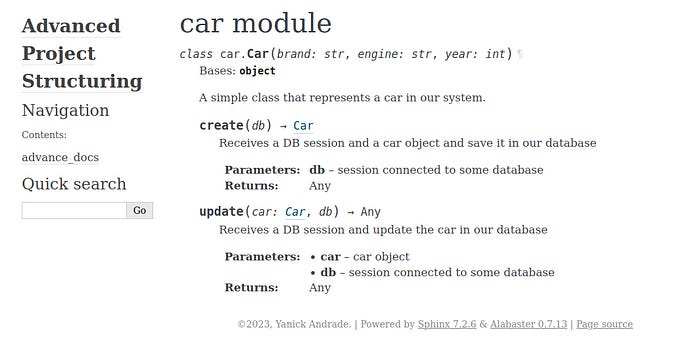
If you want a detailed article on documentation and Sphinx let me know in the comment section.
As your project grows, you add new modules, and you need to make sure they are included in the automated documentation process. This can be done by adding new modules in docs/modules.rst toctree:
advance_docs
============

.. toctree::
   :maxdepth: 4

   car
   # add new modules here as your project grows
Conclusion
Wow. This one was long, I know. Took me 3 days to complete it, a lot of research to compile things together trying to make it not boring, not too long but also not too short.
We covered important aspects that make a project resilient in terms of growth and scalability by adding tests, proper documentation, and more.
This is just the first part. In the second part, I plan to discuss more important topics and delve into more details in the ones we covered here.
Remember that a project is like a living thing: it is born (start), grows(scale), and thrives (or die, which is what we do not want).
I would love to hear from you, about what you read here, your own experience structuring your projects, and which practice you think is important that we should know.